Because iTunes is likely best known for its Mac associations, it’s quite likely that there are many households that only have their iTunes library on a Mac. If, however, a family member with a PC is heading off on a holiday and wants to bring their tunes or entertainment selection with them, it may be difficult to simply leave the copy of iTunes on one machine. It therefore makes sense to learn how to copy iTunes from a Mac to a PC to allow for greater portability for either system or either system’s music and entertainment files.
There are only a few steps involved with transferring your iTunes library from one computer to the other, and it does not matter, at least as far as iTunes is concerned, whether you are transferring from Mac to PC or the other way around. It is not a terribly complicated process, but it is one that must followed accurately in order to ensure the successful transfer of iTunes from your Mac to a PC.
Step 1. Open iTunes on your Mac
You need to open iTunes on your Mac in order to access your Preferences settings on your iTunes for Mac. Without working on your Preferences settings, you cannot successfully transfer iTunes from one computer to the next.
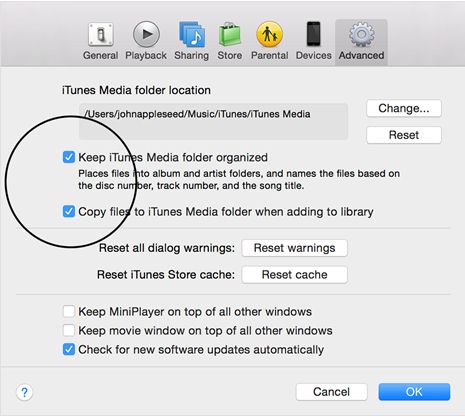
Step 2. Go to iTunes > Preferences
From here, you need to hit the Advanced settings in order to set the Mac to be able to transfer iTunes successfully over to your PC.
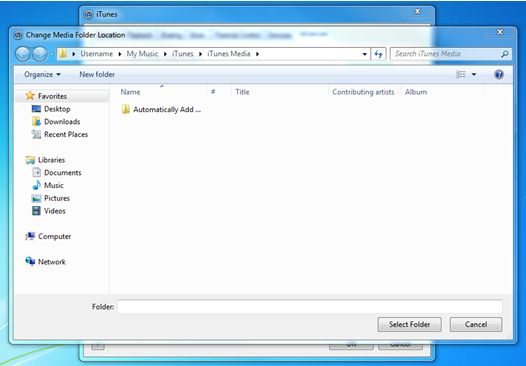
Step 3. Under Advanced in Preferences, click “Keep iTunes Media Folder Organized”
This will ensure that all your files are pointing in the right direction for your library, which ultimately makes the transference of your files easier. With an organized iTunes Media folder, your job in transferring iTunes from one system to the other becomes far less complicated.
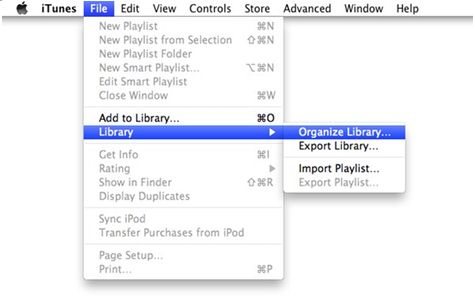
Step 4. Click File > Library > Organize Library
This will help you to keep your songs organized in order to ensure they are in the same spot when you transfer them over to your new computer. You should also click “Consolidate Files” at this point as well; that will also help you by putting copies of all media files in the iTunes Media folder and keeping all original files in their original locations. This way all the files are pointing where they should to the locations on your drives and they should be accessible when you complete the transfer to the new computer.
Step 5. Plug your portable hard drive into your Mac
This gives you a hardwired location to which to transfer your iTunes from your Mac. On this new computer, try to take the time and put your iTunes files in the same location that you want to put it on the PC, more or less. Certainly, PC’s have a slightly different naming convention than for Mac. Confirm that there is a Music folder on your PC, and within that folder should be the iTunes folder. You can transfer the iTunes Library file and the iTunes Music folder from the portable drive to this folder.
Step 6. Change the name of the iTunes Library file
Because PC systems always need file extensions on them in order to be recognized and opened appropriately, you need to take the iTunes Library file that you just transferred from your Mac and change the name so that it has the right file extension. Right click on the iTunes Library file and rename it to iTunes Library.itl, and that should allow you to open every file that you had working in the Mac version of the program.
It should be noted that when you migrate iTunes from one computer to the other, the backups that you might have made of Mac handheld devices, such as iPhones, iPads and iPods, through iTunes will likely be lost. In addition, if you do not migrate your iTunes to the exact same location on the new PC, iTunes will not be able to find the media files, and then you might have a problem effectively using the program. So, take the time to migrate the files to the right location to ensure that you will be able to find them on the new PC.
At times, though, you may find it extremely helpful to transfer your iTunes library to an external hard drive simply in order to have a backup of your iTunes library. Having your iTunes library on an external hard drive also means that should you want to share that library with another computer or another person, you will be able to do so quite easily; if you have your external hard drive with you, it is simply a matter of taking the copy of iTunes and moving it you’re your portable hard drive to the system of your choice. Having a copy of iTunes on an external hard drive also gives you a certain degree of calm, as there have been multiple times where people have inadvertently lost everything on their computers, their iTunes files included. This can be incredibly distressing when it happens, and people want to be able to avoid this. It can sometimes take hours to build up an iTunes library, and this is time that many people do not always have.
Sometimes, people want to be prepared in the event they lose all the information on their computer, and an external hard drive can be a great tool to back up an entire hard drive on a laptop or on a desktop computer. This includes your iTunes library. Music and entertainment appear to be what make the world go round; after all, music is frequently used as a method of stress release, and we now live in a society where many expect to have a variety of forms of entertainment right at their fingertips. Having your entire iTunes library go missing on your computer can be distressing, but it does not have to be, as backing up the library to an external hard drive can prevent a great deal of stress.


Any Product-related questions? Tweet us @iMusic_Studio to Get Support Directly