In recent times, flash drives have become a popular way of sharing as well as transferring files from one device to another. However, most people are not aware of the possible methods through which we can transfer music files from a USB or a Flash drive to your iTunes. Since iTunes is one of the best ways to manage your music with its immaculate ability to organize your music properly sorted by artists and albums, we will take you through the methods which you can use to transfer music from your USB to iTunes.
Part 1: Transfer Music from USB to iTunes Library Directly (iTunes Supported Songs)
The first way to transfer music from your USB to iTunes works for iTunes supported music file types only. The file types that are compatible with iTunes include MP3, AAC, M4A, WAV, AIF, AIFF, M4R, and M4B. For these files, you can basically add them directly to your iTunes and play these songs.
Now, let’s take you through the brief steps through which you can add songs from your USB to the iTunes Library
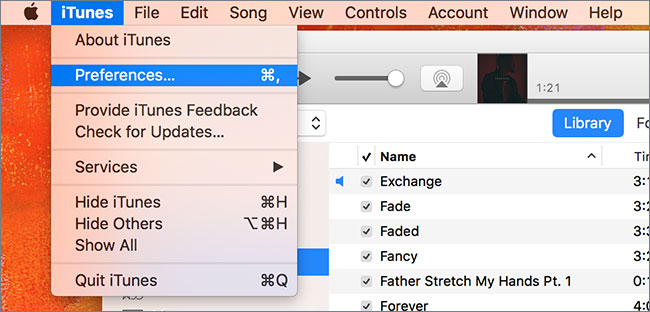
Step 1: Firstly, you will have to connect the USB containing the music files to your computer using a USB port. Double click on the iTunes icon, which will cause the application to run. Next, navigate to the “Edit” menu, and under this find the “Preferences” tab and select it.
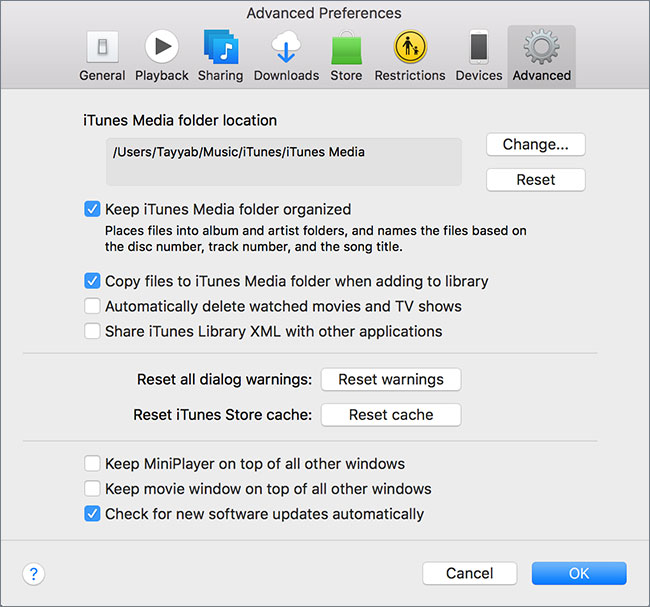
Step 2: Now, you have to ensure that there are two options that are checked and are allowed by iTunes. These are “Keep iTunes Media Folder organized” and “Copy files to iTunes Media folder when adding to library.” To ensure that this two options are enabled, you will have to access the “Advanced Preferences” option, which you can go to by clicking on the “Advanced” option after you have opened the “Preferences” tab in the previous step.

Step 3: With the options enabled, you can now begin the process of transferring music from the USB to iTunes. To achieve this, click on the “File” button. Now, select the “Add file/folder to the library” option, depending on whether you want to add specific music files, or the whole of the music collection you have, or a specific album.
Step 4: Now, you will have to search for the file that you want to transfer to iTunes. Navigate to that folder in your iTunes, and select it. Once it has been selected, all you have to do is click on “Import” and your music will be transferred from the USB to your iTunes. There’s also an alternative method to this step. Instead of clicking on the “File” button and adding music, you can just navigate to your music folder present in your USB device, and copy paste them to your iTunes library.
The process will not take a lot of time, however, it will depend a bit on how many files you want to transfer from your USB to your iTunes library.
Enjoy your music!
Part 2: Transfer Music from USB to iTunes Library (all Types of Music)
If you try to transfer music from the direct way that has been mentioned earlier, there are some drawbacks. Only certain music file types are supported, so you can’t really transfer all your music to your iTunes library. In this case, the best software that will ensure all your music gets transferred is none other than iMusic.

So what exactly is unique about iMusic?
Well, it’s a complete tool for audiophiles who love to tinker with their music. You can download from a collection of more than 3000+ songs from a variety of platforms, e.g. Facebook, Vimeo, last.fm etc. Also, it allows you to discover songs from all over the world that are carefully picked to suit your music taste. Moreover, the “Record” feature ensures that in case you listen to a song in your car that you do not recognize, you can just record it and it will give you all the information about it.
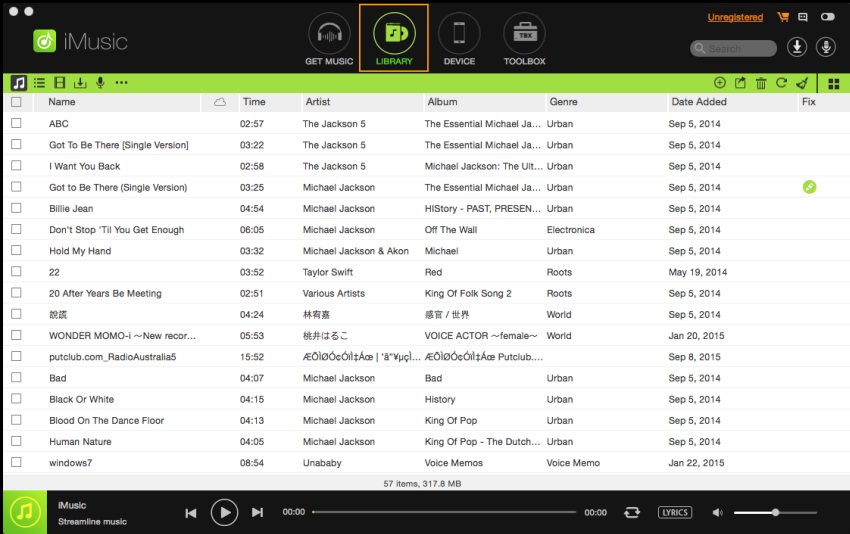
It is the iTransfer feature of iMusic which aids in transferring all types of music from the USB to iTunes Library.
Step 1: First of all, you will have to download the software from the links below. Install it on your computer. When the installation process has been completed, launch it and make sure that your USB/flash drive is connected to your computer.
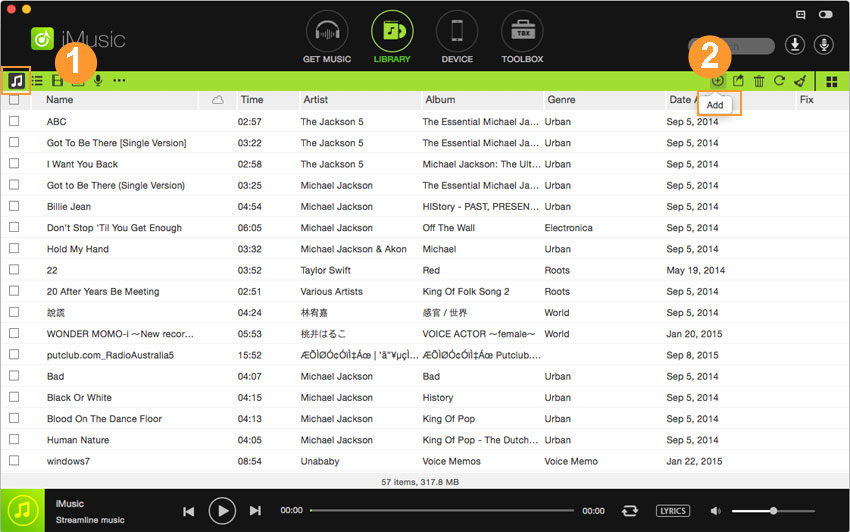
Step 2: Now, we will begin the process of transferring the music. To achieve this, you will navigate through the software, and select the “Library” window. Click on the “Add” button. To add specific music files, click on the former option. However, if you want to add a complete folder that contains music files, click on “Add Folder” option.

Step 3: Your music will now begin transferring to your iTunes. All you have to do is wait for the process to be over. It will not take a long time, and the time period depends on the amount of music files that you want to transfer from your USB to your iTunes.
The transfer process in now complete, enjoy your music!


Any Product-related questions? Tweet us @iMusic_Studio to Get Support Directly