Everyone absolutely loves to listen to their favorite music artist when they’re travelling in the car, let it be a road trip with your friends or a short ride to the workplace. You just want to get immersed in your world of music, and listen to your custom made playlists that you like to jam to every single day. In this guide, we will take you through the steps that are required to ensure that you can use the playlists that you made in iTunes and play them in your car.
However, your car stereo will only support certain playlists that are present in the .m3u music file type. If not, your music file might not be played in the car. To ensure that you are not faced with such a problem, you can just use iMusic, which is the premier software for audiophiles to discover, download and transfer music.
So what are the components that make iMusic stand out?

All things considered, the "Discover" alternative permits you to look for music from around the globe in seconds. Therefore, you will have the capacity to get to your main tunes and collections from your most loved musicians, and the best part? This is accessible in the same place. There is additionally a choice to "Download" through which you can gain access to 3,000 + songs that are downloadable. Not only would you be able to download music from the web, you can play songs that are downloaded from Facebook, Vimeo, Spotify and last.fm among other numerous platforms. Every one of these songs can be straightforwardly downloaded to your iTunes Library, and can be later transferred to other devices that you own.
Some of the time, you're sitting in an eatery, or driving out and about, and you hear a tune that you've never listened, yet you truly like it. With the "Record" feature, you can record the tune that you need, and afterward you can play it! If you like the song, simply record it. Amongst the most tedious undertakings that any audiophile fears to face is transferring the music you like to your other devices. However, now with the "Transfer" feature that iSkysoft brings to the table, you can move your music, podcasts, playlists and TV shows to all you devices in mere second. Additionally, now you absolutely never need to stress over losing your playlists again since you can make copies of them.
How to export your iTunes playlist to USB which you can put in your car stereo
Step 1: Create Playlists in iTunes Library
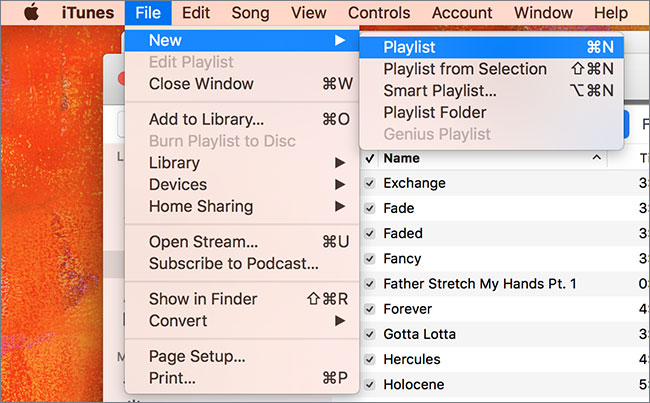
Creating a playlist in iTunes library is really easy and quick. First, you have to open iTunes library by clicking on the iTunes icon. Now, navigate to the “File” tab, and then choose the option of “New.” Afterwards, you need to choose “playlist” which will begin the process of creating a new playlist.
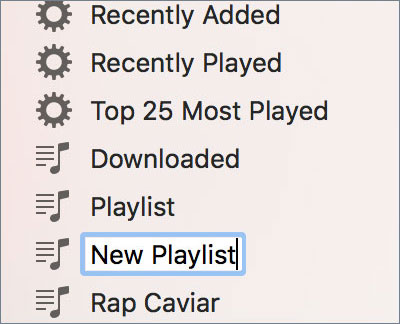
Name the playlist as you want, and then begin dragging the songs that you want to add into the playlist, on the right side of the iTunes library window. When you’re done creating the playlist, click on “Done” and your playlist will be created. It is really easy to edit the playlist in any manner. You can add more songs as well as delete songs that you do not want in your playlist. Deleting them doesn’t mean that they will be deleted from your iTunes library as well, just the playlist.
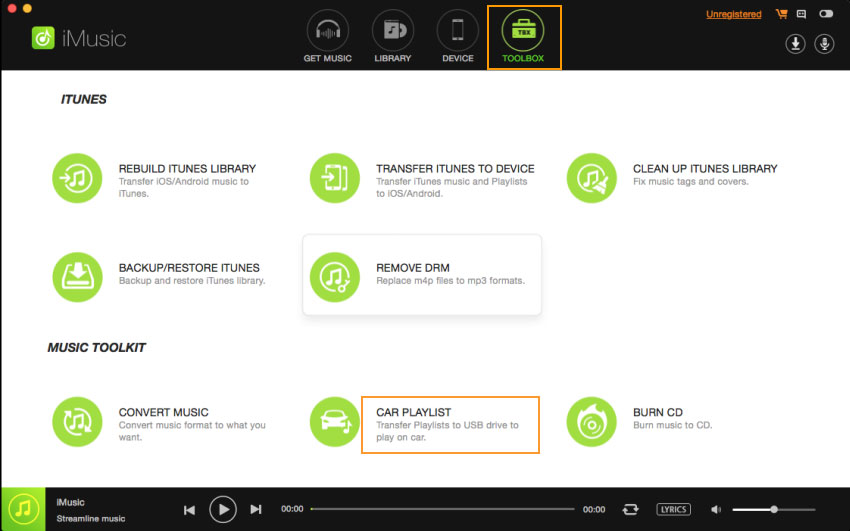
Step 2: Install iMusic
Download and install iMusic. When the installer has been downloaded, open it and the install wizard will run, and will also guide you through the quick steps that you will have to follow to install iMusic on your computer. After then, make sure that your USB is plugged into the USB port in your computer. Next, head over to the “Toolbox” section of iMusic. In this, there is a specific way of creating car playlists. Click on the “Car Playlist” option to start the process.
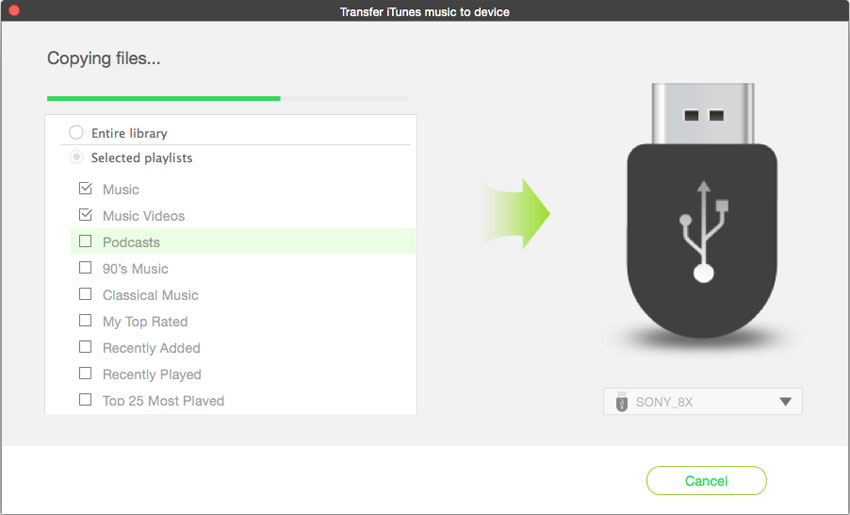
Step 3: Select Songs to Transfer
Now that you’re done with the previous step, a pop up window will open, displaying all your music that is present in your iTunes library. From here, you can just select the specific files that you would like to transfer to the USB stick that will be used in the car stereo. By default, all your music will be transferred to the USB, however you can change that and select specific music playlists to export from your iTunes to your USB stick.
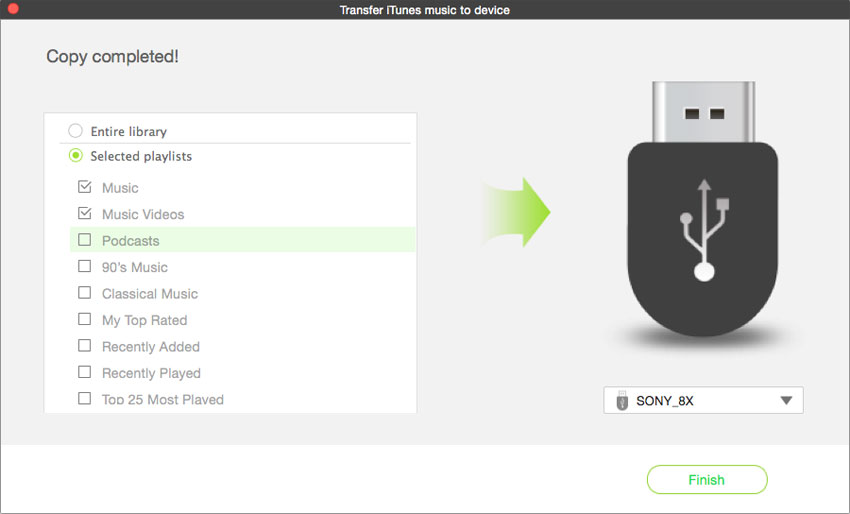
Step 4: Complete the Process
When you have finished the process of choosing which of the playlists you would like to export, just click on “Transfer.” The process of transferring the playlist will depend on the amount of tracks and playlist that you have selected to be transferred.
Now, all the music that you wish to play in your car has been transferred to the USB stick. This playlist will be in a car stereo compatible file type extension i.e. .m3u. So all your music can now be played through the USB in the car. Enjoy your music while you embark on a road trip with your friends!


Any Product-related questions? Tweet us @iMusic_Studio to Get Support Directly