Contents
- 2. Rdio Free
With the rise of the smartphone we have grown accustomed to having internet access in our pockets almost anywhere we go, and this is has revolutionized the way we listen to our music in many ways. However, there are situations even in this connected world where streaming music just isn't practical or perhaps not desirable. You may be in places where there is no reliable connection, or want to listen to your music on a device that lacks connectivity itself, such as MP3 players. Whatever the reason, having a copy of your favorite music downloaded onto your hard drive can be very useful indeed. The good news is that this is not too difficult to accomplish, for those with a paid Rdio subscription the Mac app does have limited options, but there are better solutions. This article will tell you the easiest way to download Rdio music.
Part 1. The Tool You Need for Downloading Unlimited Rdio Songs
There are several software solutions available to download your music, but for Rdio playlists the best option out there is iMusic, which is a lossless recording solution that reproduces your music in exactly the same quality as you hear it, not just from Rdio, but over 500 other streaming sites as well.

When recording, iMusic has the ability to use the industry standard ID3 tags to identify each track it records, split it off into a separate file whilst recording, and tag it with the appropriate title, artist, genre and album, making track searching easy in the resulting music library you build up. In addition, the program can automatically strip out ads from the recordings, ensuring that you are left with a clean library, fully indexed and ready to use. With the ability to add your recorded files into your iTunes library in a single click, using the files is simplicity itself.
Part 2. Step-by-Step Guide on How to Get Rdio Music on Mac
As we have shown, iMusic has a wealth of features that make it the perfect choice for iMusic and making using the downloaded files as simple as possible, however, one of the reasons this piece of software is so good is that it is incredibly easy to use. Recording a playlist with iMusic is very simple, takes no time or effort and anyone can produce great results and an instant music library in a few clicks.
What You Will Need:
A Computer;
iMusic
Time Required:
Around 3 min (Variable depending on the file size)
Difficulty:
Easy
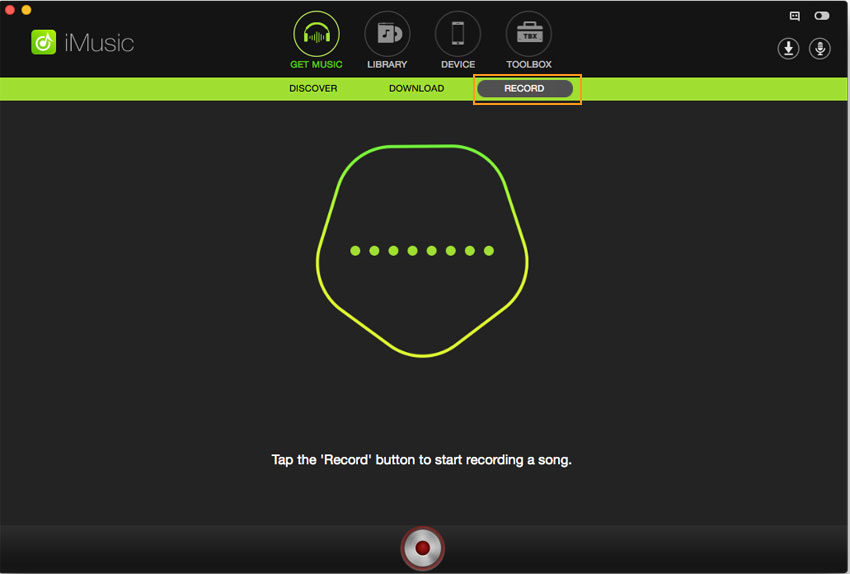
Step 1. Record Songs from Rdio
Download and launch iMusic. Go to the GET MUSIC tab and then RECORD tab. Press the red Record button. Go to your Rdio account, either on the desktop app or website, it doesn’t matter which. Sign in and find the song or the playlist you wish to record, begin playing it. iMusic will automatically detect the music and begin recording. When the music stops, the recording process will stop automatically.
Tips: Even if you use the free ad supported version of Rdio there is no need to monitor the recording. Before recording, you can click the Gear icon to choose an ideal output format and audio quality.
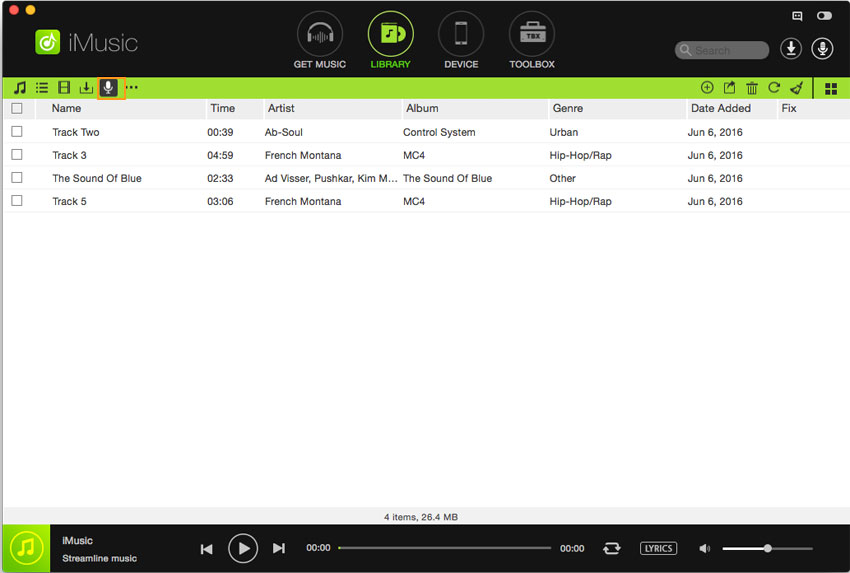
Step 2. Mange the Recorded Rdio Songs
You can access the recorded files under the Library tab. iMusic will remove ads as it goes, detect each individual track and save it to its own file, tagged with the relevant Title, Artist and Album information. If you want to edit the tag, you can control click the song and select Edit Music Tag.
If you'd like to transfer Rdio music to iTunes for playback and management, you can highlight the target songs and click the Add to iTunes button at the bottom of the interface.
Part 3. Great Tips for Enjoying Rdio Music
You can play full albums by selecting them from a search if you want, and you can then add them to a playlist all of their own, so you can listen to just that album any time you want.
Make sure you use the thumb up and down buttons often, the more you do, the better the song choices will reflect your tastes.
You have to pay the subscription to be able to use many features, but the free version gives you access to the web interface and 30 million songs, you can use that for a while to make sure it is what you are after before spending any money.


Any Product-related questions? Tweet us @iMusic_Studio to Get Support Directly