You might have a pile of music on your Android Downloads folder that is growing into an enormous dust bunny virtual counterpart. Facing a plethora of music folders with no specific arrangement can be uncomfortable. End your nightmares and do yourself a favor, get a music manager. Here we will share tips on using Google Play Music Manager for Android devices.
Part 1: What Is Google Play Music Manager?
Having a gazillion music files is a wonderful thing. But not when you feel like a helpless mouse on a labyrinth of unorganized, cluttered, music files. If you’re one of the many who likes to download a lot of songs but doesn’t have a clue how to get them arranged, then you must have a music manager companion. Google Play Music Manager is the desktop app that allows you to house all your music. It has a potential of carrying 20, 000 songs. How’s that for a start? It functions as a standalone music file organizer for your pc, but can also be synced on your Android devices. Music manager is like the motherland of all your different music genres, and your android devices can freely feed off of her majestic wonders.
Google Music Manager: The Works
Luckily, it is easy to download Google Music Manager. You can follow the instructions for downloading and setting up the app on your desktop. Note that you have to have a Google account to be able to use this app. Once it starts running, you can now sync your mumble jumble of music collection into one place. Music Manager will ask you where your files at, and you just click the different locations where you keep them. Once you’re done choosing, Google Music Manager will start to upload the files into its online cloud storage. When it’s done, then you can go pat yourself at the back for getting all your music into one place and for seamlessly backing up your files at the same time.
Side note: Make sure your music files should be in mp3, mp4, wma, flac, or ogg format. Or else, they’ll get left behind.
Now that you have set up Google Music Manager on your desktop, it is now time you understand its equally entertaining and functional step sister, Google Play Music. Google Play Music should be downloaded on your android device if you want an agreeable communication between your desktop and devices.
Part 2: How to Upload Music to Google Play Music from Android
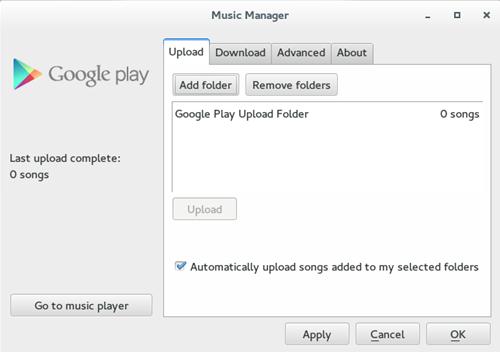
Doing this might require you to bring out your patience basket, but once you’re done, it will be rewarding, I tell you. So let’s start of by making sure that you have a Dropbox app on your android device and on your desktop. Also, download a file manager such as the Astro File Manager with Cloud on your android device. If you’ve already taken care of that, create a folder inside the Dropbox sync folder on your PC. That folder will now be dedicated to the uploads that will come from your android device. Go back to Music Manager, choose this folder and click ‘Automatically upload songs added to my selected folders.’
Now, you are halfway from uploading music from your phone to pc. Just copy the music files to the sync folder which is the Dropbox to the root of your android device’s file system. Put them in the folder, and sync. Now, the music on your device will be transferred to your pc.
Part 3: How to Transfer Music from Google Play Music to Android
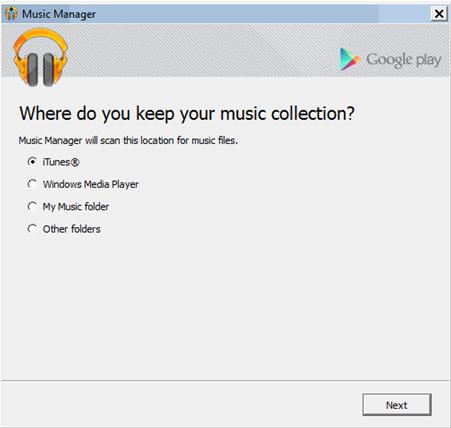
Now let’s turn the card the other way around; you want to transfer music from Google Play to your android device. Here’s what you do: Go back to Google Music Manager on your desktop. When prompted the question of where to keep your music, choose your preferred location and click next. Then you have the choice whether you want to automatically add songs from your selected folders or not. And you’re done! The Music Manager will start adding your music to Google Play and you can now listen from your devices.
Part 4: Troubleshooting on using Google Play Music Manager
1. Music Manager gets stuck while uploading
- -First, check if you still have Internet connection, you’re probably experiencing network problems. Sign out and then go back again, just sort of restart the app.
- -If this doesn’t work, make sure you have the latest version of Google Music Manager, there may be some bugs from the older version that has already been addressed.
- -If both don’t work, open music manager and click Upload tab. Uncheck the ‘automatically upload songs added to my selected folders.’ Then, click upload. This is like manually uploading songs, just so you can refresh the system. You can also try to click Run Troubleshooter to identify the problem.
2. Couldn’t find some songs I synced
- -Check for the supported file types, the song you added might need to be converted first
- -You have probably reached the upload limit of songs. If your library is already full, you can delete songs
3. Having trouble in downloading Music Manager
- -Double check if your pc meets the requirements. For mac, you be using OS X 10.5 or above. For windows, you must be using Windows XP or above.
- -Try downloading on different browsers.
- -Turn off your Internet security software first, and then download. Turn the security software back on once the download is successful.
4. Music fails to sync to my device
- -Open the google play music app and click the menu icon. Check if the “Downloaded only” is switched off. Click Settings, then Refresh. Wait for a while and check your library if your music already appears.
5. Music Manager not connecting to Google Play
- -Check your firewall settings to see if Port 80 and Port 443 are open. Make sure that Music Manager is not blocked.
- -If that doesn’t work, try opening Music Manager and click on the window. Then, press arrow keys in this order: up, up, down, down, left, right, left, right, b, a. After doing that, a new window will open, then click Open browser. Follow the prompts, and then it will display a code. Copy that code. Return to Music Manager, paste the code and submit it.


Any Product-related questions? Tweet us @iMusic_Studio to Get Support Directly