Ever since iTunes 12 has been updated, a lot of users have issues with bugs which prevents their iTunes from updating to the latest version, or just by crashing randomly. Moreover, the bugs might remove your album art, or freeze your computer. iTunes may not respond, or worse, may not open at all. Since the problems are so complicated, there is no one specific way to solve them. So, we have listed down the Top 5 effective solutions to this problem, so that you can resolve this issue and be able to enjoy iTunes peacefully.
Part 1: Solutions to iTunes Crash
#1. Go back to an old version of iTunes
The most effective way in most cases is to just degrade to the last version of iTunes that has been working for you without any glitches, and use that for a while. In the meanwhile, if there is an error in the system, Apple would solve it. So, just install the previous version of iTunes, and see if that fixes the issue that you have been facing. Mostly, this works if Apple jus trolled out a new update of the iTunes after which it stops responding.
Reset the iTunes cache
This is a solution that has worked for a lot of people. Resetting the cache sometimes leads to the problem getting solved easily. So what exactly are the steps to reset iTunes Cache?
- Open iTunes
- Access the Edit Menu. Now, click on ‘preferences.’
- Select ‘Advanced’, and then click the “Reset Cache” button.
- Now, all you have to do is sign out of your iTunes account, and the sign in again.
- That’s it. Your iTunes will not crash now!
#2. Check for issues with content files
Sometimes, iTunes can stop working and might just crash and due to some malfunction in audio files, usually when it is analyzing information regarding playback. When this happens, you will have to analyze exactly which file is causing the problems that is making iTunes stop working. To do this, follow the steps mentioned below:
- If you’re already logged into iTunes, log out.
- Now, open the iTunes folder in your laptop.
- After you’re done with this, find the iTunes Library.itl file and then move it to your desktop.
- Open the Menu bar by pressing the Control and B keys at the same time.
- You will have to open the iTunes Library now which will be empty.
- Now choose the option of “File” and then “Add folder to Library”.
- On your laptop, open the folder which contains all your music.
- Choose whichever song, artist or album you want to add to the library and then move them into the iTunes tab that is open.
- iTunes will now add the specified items to your library and then will scan for any gapless payback.
- If that is successful, continue adding music. Your iTunes will work perfectly now.
#3. Problem with the QTMovie.dll file
iTunes library might have a problem with a dll file, which is really bothersome. To solve this issue, the steps are simple:
- First of all, access the Program Files (x86) folder on your laptop. Now, open the Common Files folder, and then the “Apple folder”.
- Next, open the “Apple Application Support” folder and search for a file that is named QTMovieWin.dll file.
- Copy this file, and then paste it into the iTunes (32/64 bit) folder depending on your laptop’s windows.
- Check if iTunes is working without any glitches or not.
#4. Tinker with iTunes Plug-ins
Sometimes, it is the iTunes plug-ins itself that might overload iTunes, causing it to crash. To counter this problem, try removing the plugins itself using the following procedure:
- Your Plugins will most likely be located in the “Users” folders in your disk drive. Now, open the App Data folder and then click on the App Data folder.
- Next, you will have to open the Roaming folder, followed by “Apple Computer” and then iTunes.
- In the iTunes folder, you will find iTunes plugins files. If these files are present, you have to move them to your desktop.
- Once that this is done, check and see whether the issue persists or whether it is gone.
These are some of the ways through which you can counter the problems that your iTunes Library might be facing, and now you can enjoy your music again.
#5. Backing Up Files
By now, you know that iTunes Library might unexpectedly crash, causing you to lose files, your favorite playlists containing your most played songs from your favorite artists. In order for you to not lose them permanently, it is always a good idea to keep backups of your iTunes Library in case any mishap happens. So how exactly can you backup and restore your iTunes Library. The process is simple. Just follow the steps mentioned below.
- First of all, open your iMusic.
- Click on the Toolbox option, and access the iTunes section, choosing the Backup/Restore option.
- To backup all your music, choose Backup option in the pop up window that is now open. This will now give you access to the Backup iTunes Library window. By default, all the content present inside your iTunes Music library will be backed up. In case you don’t want to back some specific music files, just uncheck those files and they won’t be backed up. You can even choose the folder where you want to back up your files to by clicking on the “Folder” icon.
- To Restore all your music, click on the “Restore iTunes Library” instead of the backup one. All the backup files that you have created will be present here. As a default, iMusic chooses the library that is with the latest date, however you can also choose the one that you want to restore.
- All the music that is present in the file will now be restored. Do not forget to select the option of “Delete the entire iTunes library before restore from backup.” This will ensure that all the existing date is erased, and the new backed up version is present only.
- Do not forget to select the option of “Delete the entire iTunes library before restore from backup.” This will ensure that all the existing date is erased, and the new backed up version is present only.
Part 2: The Perfect Backup/Restore Partner - iMusic
Backing up your music again and again and then restoring it might seem like an arduous process to some people. In that case, why not use iMusic, which can not only easily backup/restore your music, but also is the perfect music companion for you. Through this software, it is possible to find new music, download it, as well as recording songs that you’ve just heard and want to save for later. One of the biggest advantages this software has is that is compatible with Android and iOS. For backup/restoring iTunes Library, iSkysoft has a specific feature called iTransfer, which will back up all files available on iPhone, iPad, iPod as well as Android phones. The steps to achieve this target are mentioned below:

Step 1: First of all, connect your device with the computer using a USB data cable, and then open the iMusic application. Your phone/table will be recognized in an instant and be displayed in the windows. Select the “TOOLBOX” option at the top menus. Then click on the RUBUILD ITUNES LIBRARY option.
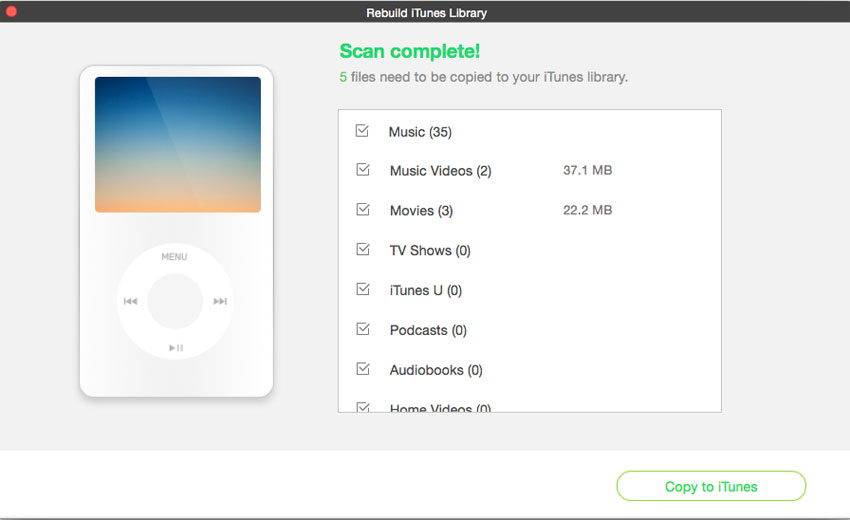
Step 2: In the new window, you can see files from your connect files like Music, Movies, TV Shows, etc showing. Choose them and click Copy to iTunes button to start to begin the process. That’s it!
iMusic is a great tool that integrates all the features you need for getting and managing music. It is able to download and record music from music sharing sites, transfer music between computer and iTunes Library, iPhone, iPad, iPod, and Android devices. Here are its main features.
- Download music from more than 300 music sites to totally free.
- Download YouTube music to MP3 and save to iTunes Library directly.
- Record music from music sites, software that can play music on computer.
- Transfer music between Mac, Windows, iTunes Library and iPhone/iPad/iPod and Android devices
- Built-in "LIBRARY" gathers all the songs on your computer for further music fix and management.


Any Product-related questions? Tweet us @iMusic_Studio to Get Support Directly