Part 1: What is Audacity Online?
Audacity Online is a software application meant for recording and editing sounds. Today in a world full of novelties, this software seems to be a handy support for mixing, matching, editing or creating new soundtracks. Whether you are a musician or a music director or simply a music lover experimenting with tracks, Audacity Online software is the perfect software for you. This innovative software is available for almost all types of operating system, like Windows, Mac and Linux. Apart from recording voices and speeches with the help of microphone, Audacity extends an entire range of tools for excellent editing effects.
You can download Audacity Online by clicking on its link and installing it for free in your computer.
Part 2: How to Use Audacity Online to Record Audio
Even though recording soundtracks from CDs or DVDs is no big deal, recording streaming music can be quite complicated. There is no limit to the music that is available on the various musical sites and music stations. We love to listen to old and new tracks of various genres. However, we are charmed and mesmerised by some lyrics and soundtracks. At times we wish to record such musical files, some songs or even the background sound of some video games or movies. Audacity Online facilitates all of these types of recordings. The easy steps to record live sounds from the internet are as follows:
- Step 1: Audacity Online software should be downloaded and installed.
- Step 2: Once the installation is done, open 'Audacity'.
- Step 3: On the drop down menu, you will find that the default is set to 'Microphone. Change the setting from 'Microphone' to 'Stereo Mix' and 'Copy my settings'.
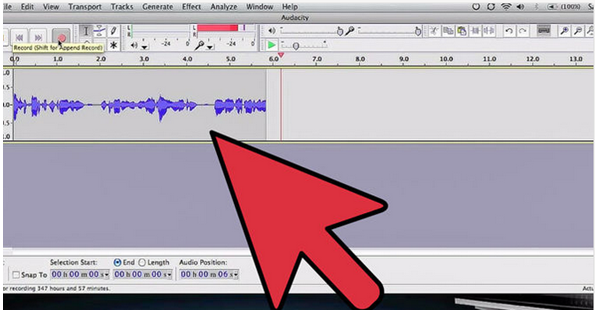
- Step 4: Open YouTube; press 'Play' on the YouTube video after pressing 'Record' on Audacity. Let the levels be at 0.
- Step 5: After this you have to download the Lame MP3 which is also recognised as lame_enc.dll. It is free but has to be downloaded.
- Step 6: Save the lame_enc.dll as it will be required when you save a file in an MP3.
- Step 7: Export MP3.
- Step 8: This is the easiest and the safest way to record Audio and convert it into an MP3 file.
Part 3: How to Use Audacity Online to Edit Audio
Very often people want to collect and assemble various types of musical tracks and albums. They wish to alter sound effects by adding something or removing other things from the existing files. In other words, we may say that people wish to edit their Audio collection. This is where you will find Audacity to be most helpful. It allows you to edit various kinds of audio tracks and files. It is accompanied with suitable features required for editing. You can edit an audio file by the following steps:
- Step 1: Choose the file you want to edit. The first step for editing is to know exactly what you have to edit. Whether it is a CD, DVD or a downloaded piece, you can edit anything with Audacity.
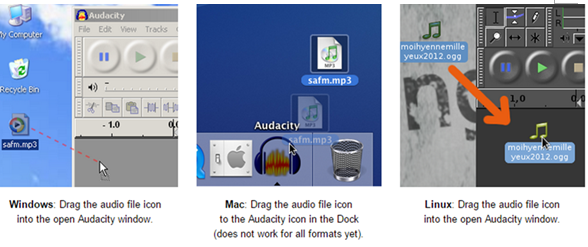
- Step 2: Let the file be imported to Audacity. You can either drag and drop the music file icon into the open Audacity window; or by selecting File> Import> Audio.
- Step 3: Cue-up and Fade in: The silence in the beginning should be deleted and a short segment should be selected. After selecting a short segment from the file, attempt the Fade-in by choosing Effects> Fade-in.
- Step 4: Remove unwanted noise and sounds from the file. By this, the unwanted part can be cut and removed; the volume can be minimized; the volume can be entirely silenced or some other sound should be entered in its place. You can cut or delete the part you do not want.
- Step 5: Equalise your files by boosting or reducing frequencies of your music files. In order to get a smooth and rumble free sound, you need to equalize your file. For this the Equalization option has to be selected from the Effects menu.
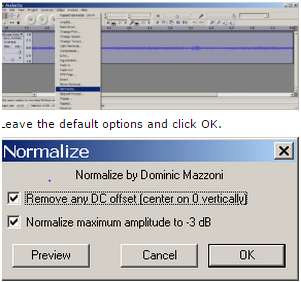
- Step 6: Normalize your file to get the loudest sound without any kind of distortion. This can be done by selecting the file and selecting 'Normalize' from the 'effects' menu.
- Step 7: Fade out the last second. For this click Edit>Select>Cursor to track end. Then click Effect> fade out.
- Step 8: Export the file from Audacity to your device. In order to play the recorded and edited file, we need to export the file from Audacity to the device of your choice probably in MP3 format. To do this, go to Edit > Preferences> File formats >Mp3 export set up.
- Step 9: Check the new Audio file by opening the new saved file in the MP3 format. Your success will amaze you and all credit to the Audacity Online software that is a freeware too!
Part 4: Best Audacity Online Alternative You Must Know
iMusic is the best and highly recommended alternative of Audacity Online Alternative for audio recording and editing software. iMusic is specially designed for users to download and record music. Below are its main features:
- Record music to MP3 format from countless music sites and radio stations. It almost follows the principle: you can play it, then you can record it.
- Advanced ID3 technology allows you to fix music tags: cover, album, singer, genre, title and more automatically.
- Automatically filter out the Ads between two songs, making the recording complete without a hitch.
- Built-in music library allows you to download music by a single click and "Download" feature enables you to download from 3000+ sites.
- Transfer music between computer, iTunes Library, iPhone, iPad, iPod and Android phones.
Users have highly appreciated and recommended to use iMusic. They say that this recorder has helped them download Spotify on their PC and the sound quality is also great.
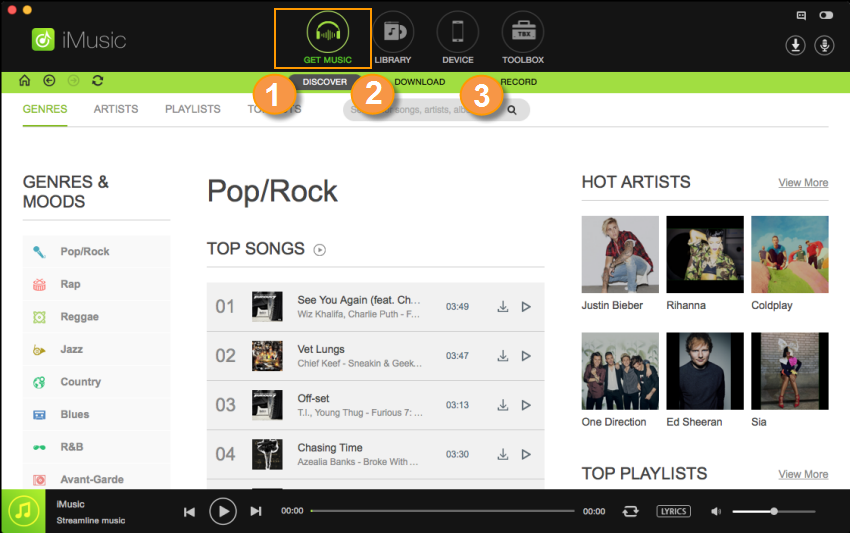
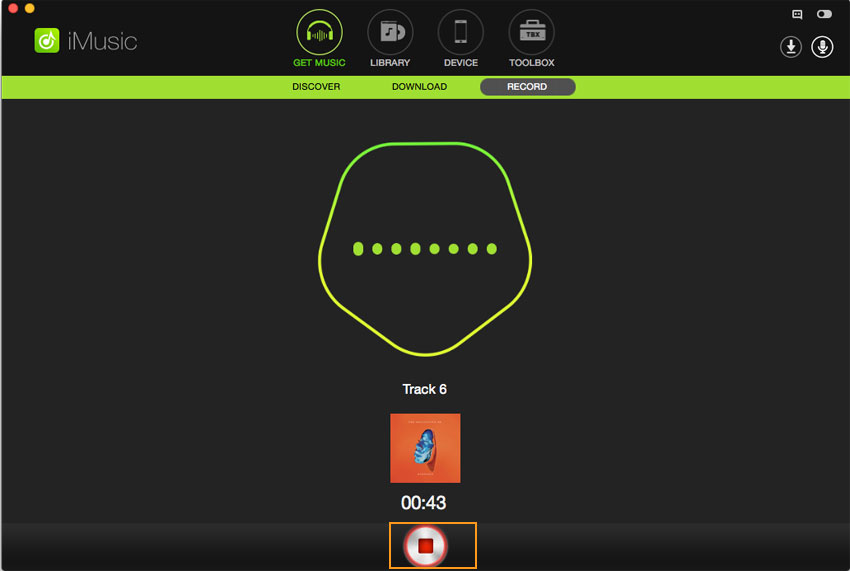
Step 1. The first step is to download the application and launch it on your computer (Mac or Windows PC). Click "GET MUSIC" > "Record".
Step 2.In the record window, click the red button. Then, go to the music site and play the audio. The recorder will detect the file and start recording automatically!
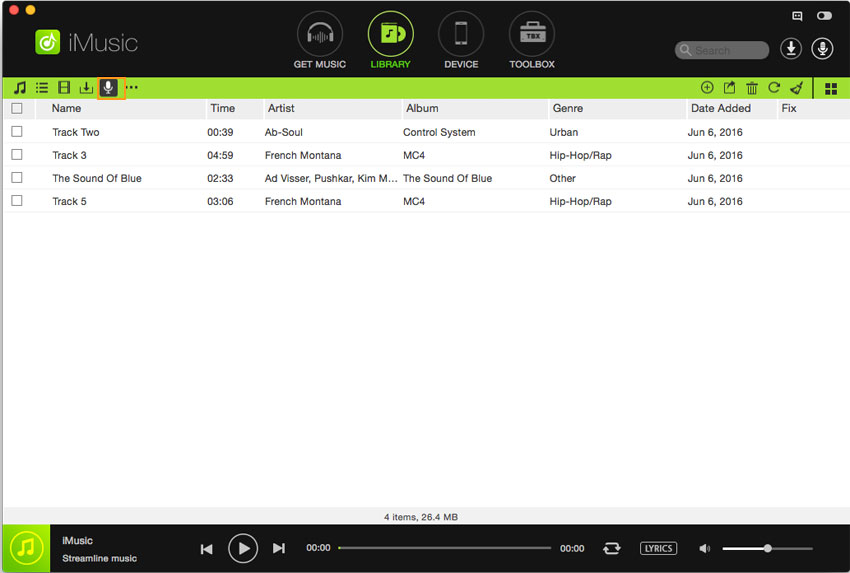
Step 3. When you have recorded a song and want to check the audio quality, just go to the Library by clicking the "LIBRARY" button on top and double click any file to play it.



Any Product-related questions? Tweet us @iMusic_Studio to Get Support Directly