An AAC or Advanced Audio Coding is a type of audio coding which is intended for lossy digital audio compression. It's particularly designed to succeed the MP3 format. It generally produces better sound quality than that of MP3. In this article, we will share tips about Audacity AAC.
Part 1: What is Audacity AAC Plug-in
A plugin, also called add-in, extension, or add-on, is a software component which adds a certain feature to a current software app. When a certain app supports the plug-in, it gives way for a better customization.
With Audacity, you can now get AAC Plug-in and other types of plug-ins installed without having to restart Audacity or without having to add or delete any generator or effects from the menus. Audacity is a totally free, simple to use, and multi- faceted audio recorder and editor for Mac OS X, Windows, GNU/Linux, and other OS (operating systems). You can maximize Audacity to record audio live, record computer playback into CDs or digital recordings, and edit multiple types of sound files including AAC. You can conveniently cut, splice, copy, or mix different sounds together. There are also lots of effects that you can integrate, like changing the pitch or speed and the vocal isolation or reduction. There are so many things one can do with Audacity.
Part 2: How to Use Audacity Edit AAC Files and Export to iTunes
Here are the basic things you can access using Audacity's editing power:
- Very simple editing tools which can Copy, Paste, Cut, and Delete.
- You can find the specific spot to edit in a snap with the use of Timeline Quick-Play or scrubbing and seeking.
- You can enjoy unlimited Undo or Redo within the session, allowing you to go back to any number of steps previously made.
- You can edit and mix a huge number of tracks.
- Numerous clips are allowed for every track.
- They make available the Label tracks along with a selectable Sync-Lock Tracks feature to keep labels and tracks synchronized.
- Draw Tool made to modify every sample point.
- Envelope Tool made to smoothly fade the volume up and down.
- Automatic Crash Recovery in cases of irregular program termination.
Now let's talk about how to use Audacity to edit AAC Files and export them to iTunes. Prior to exporting the audio for us towards iTunes, it is vital to note which audio file format you'd like to utilize. Now that you've identified that you'd like to use AAC, you should note that AAC files are compressed. Thus, they can occupy lesser disk space. Audio damage might occur due to the compression, particularly when utilizing low bitrates.
Also, AAC is a default format pre-set by iTunes itself and it's also the format that Apple utilizes for audio files sold right from iTunes store. Thus, it's basically the most apparent choice when you're an Apple user. You may consider using MP3 when you consider switching to or another phone or portabe music player in the future. If you've got got a lot of disk storage space right on the device or if you simply have a minute music library, consider having a large lossless AIFF or WAV formats.
There are actually a lot of benefits of utilizing compressed format right on iPhones and iPod. The 2 major advantages are:
- You can store multiple songs in one device.
- Having compressed files improves battery life since disk reads rather consume heavily on the battery power.
Should you opt for lossy format (AAC or MP3), the minimum bitrate settings that you must use for the music should be 160 kbps. (256 kbps is ideal).
The proprietary format of Apple produces small, lossy files like that of MP3. The quality is kindred to MP3 as well. These files are made with the extension .m4a. AAC is very useful for storage on iTunes or iPod because of its inherently minute file size. This reduced disk occupancy is a plus particularly when you've got iPod with relatively small disk.
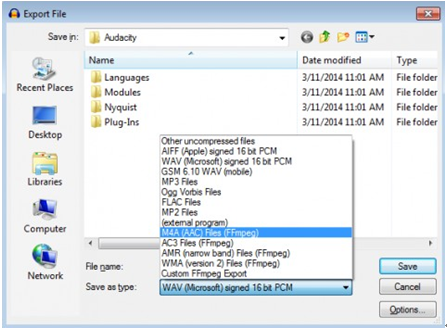
Now, about the exportation method, Audacity could export directly to AAC upon installation of the optional Fmpeg library. In order to export AAC, select M4A (AAC) Files (FFmpeg) right in the Export Audio window, and then type in the file name. When you're exporting AAC file to your mobile gadgets, you could add the 3GP extension or the M4R right next to the file name and the dot as needed by your device. It's that simple!
Part 3: Directly Record Audio for iTunes
If Audacity doesn't seem to be very suitable for you, there's no need to worry. There are still lots of alternatives that you can resort to. iMusic is another dependable software that has multiple functions. One of the many purposes it serves is directy recoding audio to iTunes.
It has been embraced further by its users because of the following apparent points it encompasses:
- 100% Clean: Their software is free from any types of virus or malware. It is totally safe for installation and running.
- Fast service: They have made lots of clients satisfied because of their super-fast service.
- Quality: The sound quality they produce is exceptional. It's something everyone has been looking for.
- User- friendly: Their user- friendly web navigation, interface, and application make it all the more commendable.

Steps to Record Music to iTunes
The iMusic for Windows PC could help you in recording music to iTunes. Your playlist can also be directly exported with an "Add to iTunes" feature.
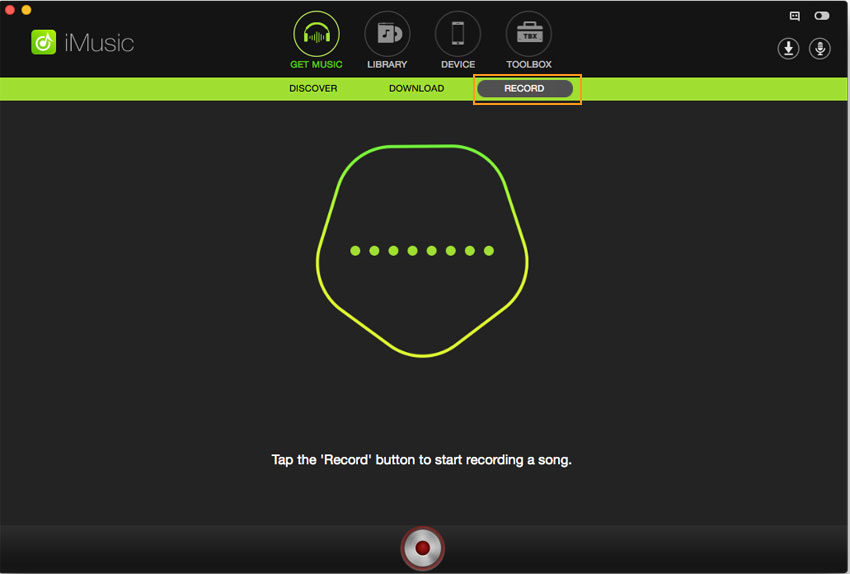
Step 1: Download the application and follow the installation instructions to install it. Launch the program. Click the RECORD tap and press the red button to get ready to record music.
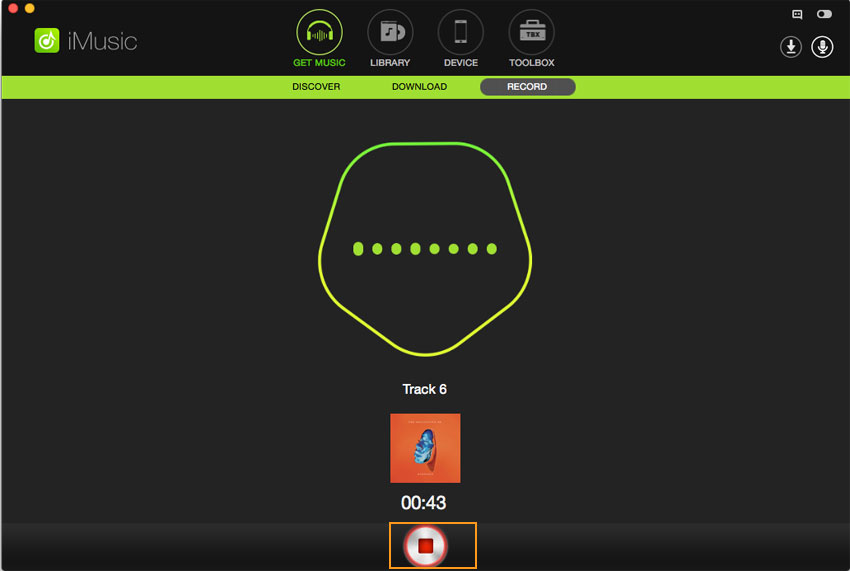
Step 2: Then go to the audio or video you want to record. Play the audio or video. The application will begin to record only upon detection of the sound. Meanwhile you don't have to look after it. Press the red button again to stop recording if you want it to stop.
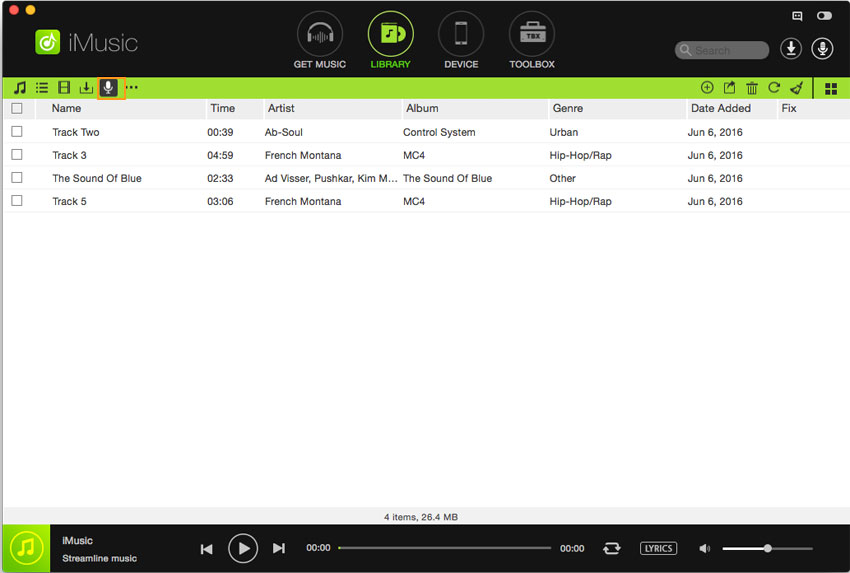
Step 3: To listen the recorded music, you can simple click LIBRARY tap to check them. And you can transfer them to your iTunes Library or playlists directly bu clicking "Add to iTunes button.


Any Product-related questions? Tweet us @iMusic_Studio to Get Support Directly