Audacity is free software that has gained a huge popularity among the people that love to work with music. It is very simple software to work with. This software runs on multiple platforms. This is a great multi-track audio recorder as well as editor that have gained popularity among the masses because of its simplicity. This software has got numerous great features like audio editing, recording audio, removing vocals from songs, speed changing of audios etc. Audacity can also cut, copy, as well as mix sounds with absolute ease. Below are complete tips about Audacity remove vocals.
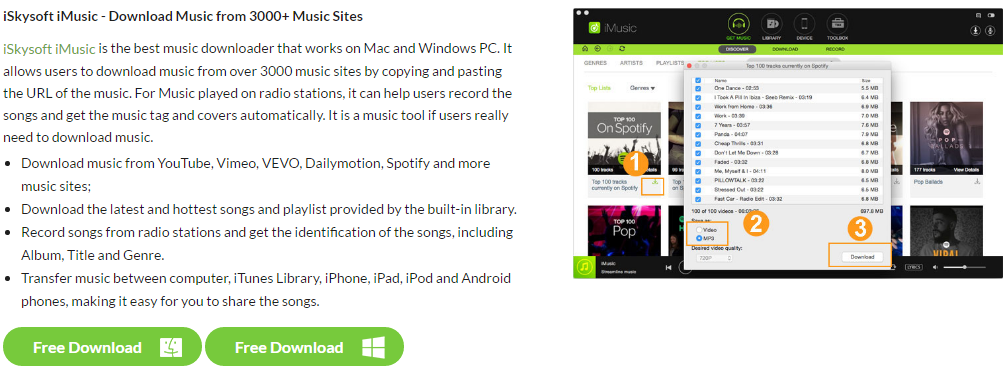
Best Music Downloader, Recorder and Transfer Software You Should Never Miss
Part 1: Audacity Remove Vocals from Song
People mostly use this software for the purpose of removing vocals from a song. This is a very easy procedure. For those people that dream of becoming a singer and loves to sing karaoke songs, audacity has given the opportunity to them to create their own music by helping them to remove the vocals from the original tracks. The steps that need to be followed to remove vocals from a song using audacity are:

Step1. To remove the vocals from a song, the first things that a person needs to do are downloading and installing audacity for free in his or her computer. Then the program has to be opened.
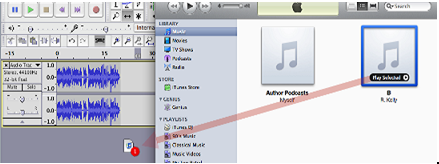
Step2. After opening audacity in the computer, the next thing that needs to be done is, dragging the selected song into this open program. It does not matter if the song is in the desktop or in any folder of the computer. Dragging is just the easy part of this procedure. Songs can also be downloaded directly from iTunes as well.

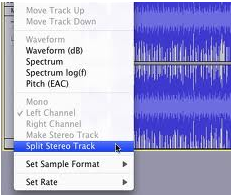
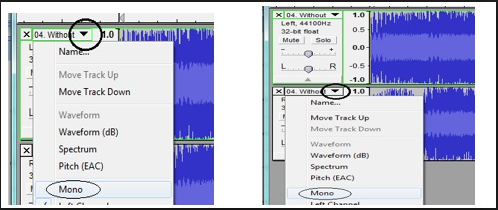
Step3. Within a stereo track, there are two channels. The vocals are normally placed within the "center channel" and the music associated with the vocal is placed in the other channel. Now it is required to remove the "center channel" and keep the other channel intact. To split the stereo track, it is required to go to the drop down arrow beside the song name in the upper left corner of the sound track. After the drop down opens up, clicking on the option "Split Stereo Track" will get the job done.
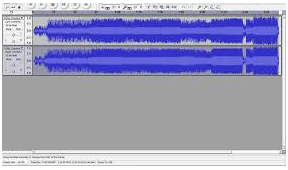
Step4. The next step involves selecting the track in the bottom among the two available tracks within audacity. Select by double clicking.
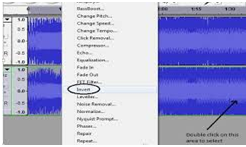
Step5. This step involves inverting the bottom track. To do this, a person needs to go to the "Effects" tab and then chose the option "Invert". This will serve the required purpose.
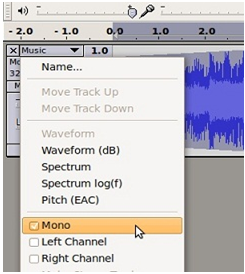
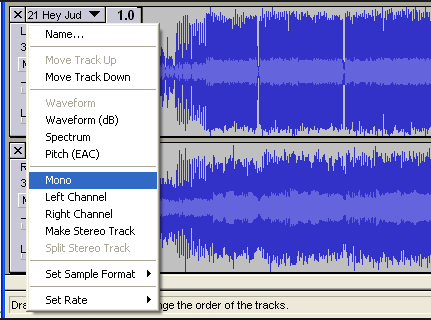
Step6. After inverting the bottom track, a person is again required to go back to the dropdown arrow beside the name of the song. On clicking this dropdown arrow, a person can see the option "Mono". This option has to be selected for both the tracks present. This is done for the sole purpose of routing every available audio signal present through a single channel.
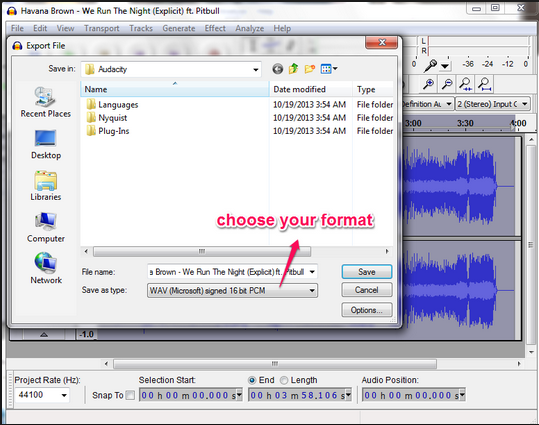
Step7. After setting both the tracks to "mono", the only required thing is to play and hear the music without the vocals and then exporting it. For the purpose of exporting, a person needs to go to the tab "File" and then click on the option "Export". Once the option "Export" is clicked, a box will pop up asking for the name in which the exported file will be saved. The person can select any name he or she wishes and then click "Ok" for exporting the file. This is enough to remove the vocals from a song without any major hiccups.
Part 2: Audacity Remove Vocals from MP3
A person might require removing the vocals from MP3. This can also be very easily done with the help of the free software named Audacity. Audacity actually works with any kind of music. Sometimes vocals are not completely removed, but still they are almost inaudible. Removing vocals from MP3 is almost similar to the steps required for removing vocals from a song, with just a few twists.

Step1. The first thing that a person needs to do for removing vocals from MP3 track is to download and install Audacity for free from the internet. It is not at all hard to install Audacity and it is compatible with Windows, Mac as well as Linux based computers.

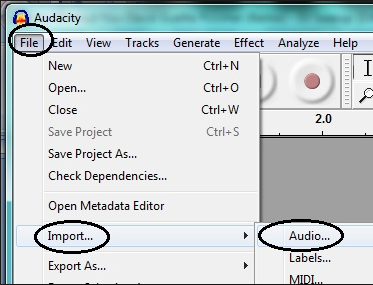
Step2. The second step involves selecting the MP3 song from which the vocal part needs to be removed. Then the MP3 has to be imported to Audacity.
Step3. The third step involves splitting the MP3 track. On clicking the dropdown at the top left corner, the option to split the MP3 track appears. This option helps to split the track into two parts, the Left track and the Right track. One part is the vocal part and the other is the musical part.
Step4. Now it is required to select the Right track. This can be done by clicking on the part above the "Solo" and the "Mute" area. This is enough to highlight the Right Track.
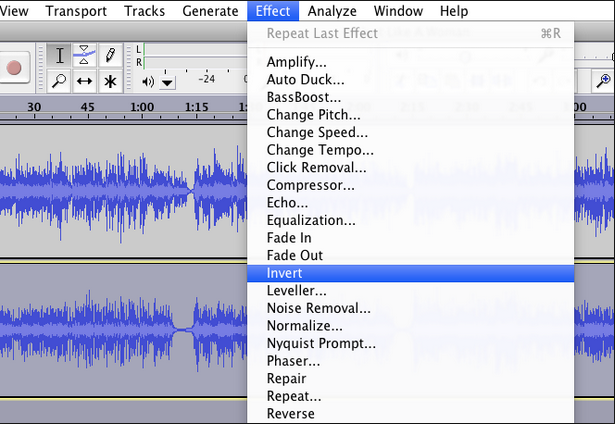
Step5. Now the person needs to go to the "Effects" option and click "Invert".
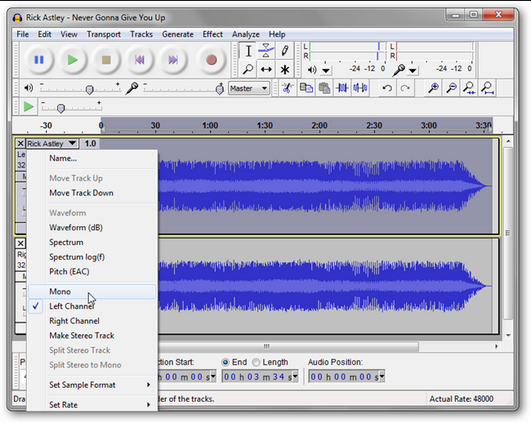
Step6. After inverting, the person needs to make both the tracks "Mono". This can be done by clicking on the dropdown arrow of each track individually. On doing this both the tracks are converted to "Mono".
This is all that is required to separate the Vocal from the music part of the MP3 track. Now the musical part can also be saved as MP3. This is a great option given in Audacity.
Part 3: Audacity Remove Vocals from Mono Track
In case a person is trying to separate the vocal from the musical part of a song that was recorded in mono format, then the procedure is bit different. As there are no Left and Right tracks for mono songs, so a different method has to be followed. Audacity is capable of separating the vocals from the musical part of a mono song.

Step1. First step is the same as what was applied earlier and that is downloading and installing Audacity for free.
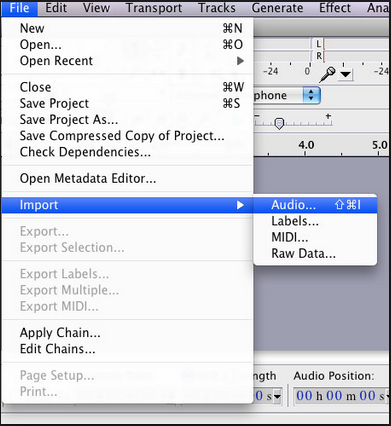
Step2. The second step is also the same and that is just importing the mono song from the computer desktop or file.
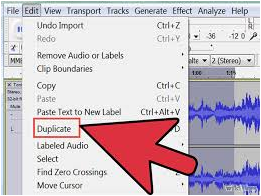
Step3. The third step becomes different. Here, it is required to duplicate the track, as there are no Left and Right tracks. This can be done by clicking on the "Duplicate" option of the "Edit" menu.

Step4. Once the track has been duplicated, the duplicate track has to be kept mute. This can be done by clicking on the "Mute" option at the left side of the duplicated track.
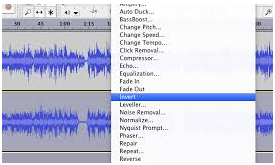
Step5. Now comes the important part. Now it is required to click the dropdown on the top left and click "Split Stereo Track". As soon as it is split into two parts, a person is required to double click on the track at the bottom. The second wave form gets selected. Now from the menu, it is required to select the "Invert" option from "Effect".
Part 4: Audacity Remove Vocals Not Working
Many people are unable to remove vocals from a track using Audacity. This can be due to several causes. It is mostly not due to an inherent problem with Audacity, but due to wrong way of trying to separate the vocals. Also if the vocal tracks and musical tracks are created separately and then mixed in stereo form, then only it is possible to remove the vocal part completely. So it is necessary for a person to understand the limitations before jumping into any conclusion.
Part 5: How to Create Your Own Vocal with Audacity Karaoke
Many people love to hear their own voice with the actual music of a song. Audacity gives a person the opportunity to record his or her voice along with the original music track and make a person proud. The steps involved are:

Step1. Again the first thing is to download Audacity for free and then install it into the computer.
Step2. The second step involves selecting the song from which the vocals need to be removed. It can be selected from the desktop or from any of the files within the computer. The song just needs to be imported to Audacity.

Step3. As soon as the song is imported to Audacity, a person can see two tracks. These are actually the two stereo tracks within the song from which the vocals need to be removed. The first thing to do is to split the two tracks by choosing the option "Split Stereo Tracks".
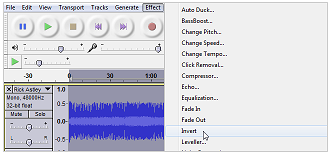
Step4. Now as soon as the splitting part is over, the person needs to double click on any one of the track and select the option "Invert from "Effects" menu. This has to be repeated for the other remaining track also.
Step5. The final steps involve clicking on the black arrow at the top left for both the tracks and selecting the option "Mono" to complete the procedure. Now the person is ready with the Karaoke track minus the vocal part. This is an absolutely easy procedure and can be handled by children as well.


Any Product-related questions? Tweet us @iMusic_Studio to Get Support Directly